Stop Breaking Your Laptop Charger: The Right Way to Coil It
Senior Hardware Diagnostics Specialist & Lead Thermal Editor at Laptop Post Testing Lab · CompTIA A+, ACMT, B.S. in Computer Engineering · 12+ years bench-testing laptop thermal solutions & motherboard repairs
Learning how to coil and store laptop charger cable without breaking internal wires is the most effective way to extend the life of your equipment. Many users unknowingly cause damage by wrapping cords tightly around power bricks or bending them at sharp angles. These practices create micro-fractures in the copper conductors hidden beneath the protective jacket.
Manufacturer specifications indicate that cable longevity depends on maintaining a natural bend radius. When you apply tension or create tight kinks, you accelerate material fatigue at critical connection points. Adopting a more deliberate storage routine prevents these common points of failure, keeping your charger functional for years.
Quick Answer
Coil your laptop charger using large, relaxed loops. Never wrap the cable tightly around the power brick. Always use a Velcro tie to secure the bundle.
Keep the cable in a dedicated, spacious electronics pouch. Avoid sharp bends at the plug end. These habits prevent internal wire snapping and insulation fraying.
Why Your Charger Cable Keeps Breaking
The primary reason laptop charger cables fail is persistent mechanical stress on the internal copper strands. Inside the outer jacket, thin wires are bundled together to carry electrical current. When you wrap a cable tightly, these wires are forced into a sharp radius.
This action stretches the outer strands while compressing the inner ones.
Over time, this repeated physical stress creates micro-fractures in the metal. Even if the outer plastic coating looks perfect, the internal circuit may be broken. Aggregate user reports show that this process often occurs near the power brick or the connector head.
These areas act as fulcrums where the cable receives the most movement.
The Hidden Anatomy of a Laptop Charger
A standard laptop charging cable is composed of multiple layers designed for flexibility and safety. At the center, you have the copper conductors that carry the power from the wall outlet to your device. Surrounding these is an insulating layer, often made of thermoplastic elastomer or PVC.
The most sensitive part of this assembly is the solder joint at the connector. This is where the flexible wires meet the rigid plastic housing of the plug. Per guidelines from UL Solutions, cables are tested for bending cycles, but they are not designed to endure aggressive coiling.
Once the internal shielding or the copper strands inside this joint snap, the cable will only work if you hold it at a specific, awkward angle.
The Physics of Failure: Why Tight Coiling Kills Your Cord
Tight coiling forces the internal wires to bend beyond their design limits. When you wrap a cable around your hand or a power brick, the inner part of the loop experiences extreme compression. The outer part of the loop experiences extreme tension.
Think of it like bending a paperclip back and forth repeatedly. The metal eventually fatigues and snaps. Your charger cable behaves the same way when stored improperly.
The tighter the loop, the more severe the force on the copper. Large, loose loops distribute this pressure across a wider surface area, which keeps the cable in a stable state.
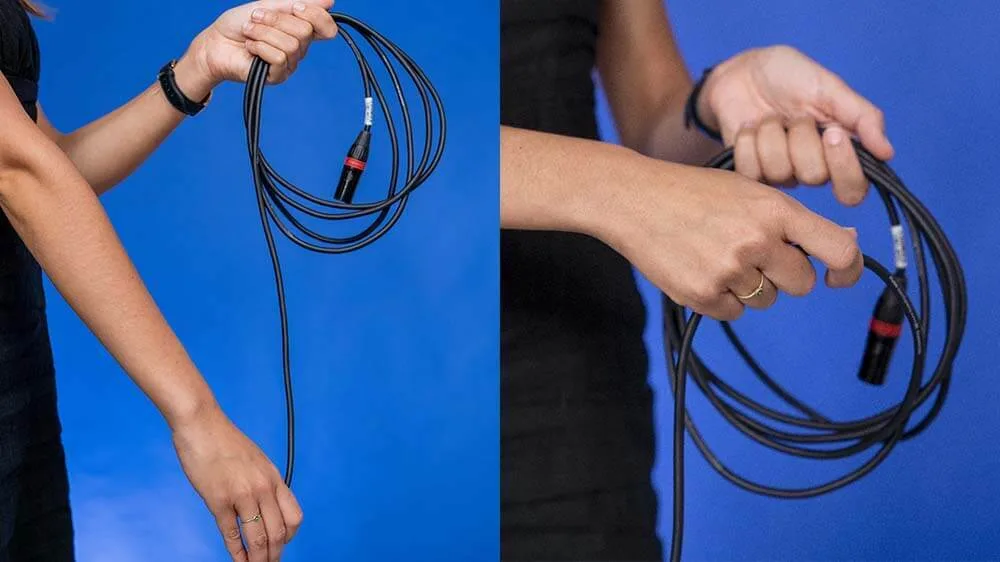
Master the Over-Under (Roadie) Coil Technique
The over-under technique is a professional standard for managing long cables without introducing twists. Unlike standard coiling, which adds a twist to the cable with every loop, this method cancels out the rotation. It keeps the cable flat and prevents tangling.
- Hold the cable near the power brick with your non-dominant hand.
- With your dominant hand, pull a loop of cable toward you, twisting your wrist outward.
- For the second loop, reach forward and twist your wrist inward, pushing the loop under.
- Alternate this motion until the entire length is coiled.
- Use a Velcro strap to hold the bundle together, ensuring the loops remain loose.
Visual Check: How to Identify Healthy vs. Damaged Cables
Regular visual inspections help you catch potential failures before the cable stops working entirely. A healthy cable will have a smooth, uniform jacket without any visible lumps or creases. When you lightly run your fingers along the length of the cord, it should feel consistent.
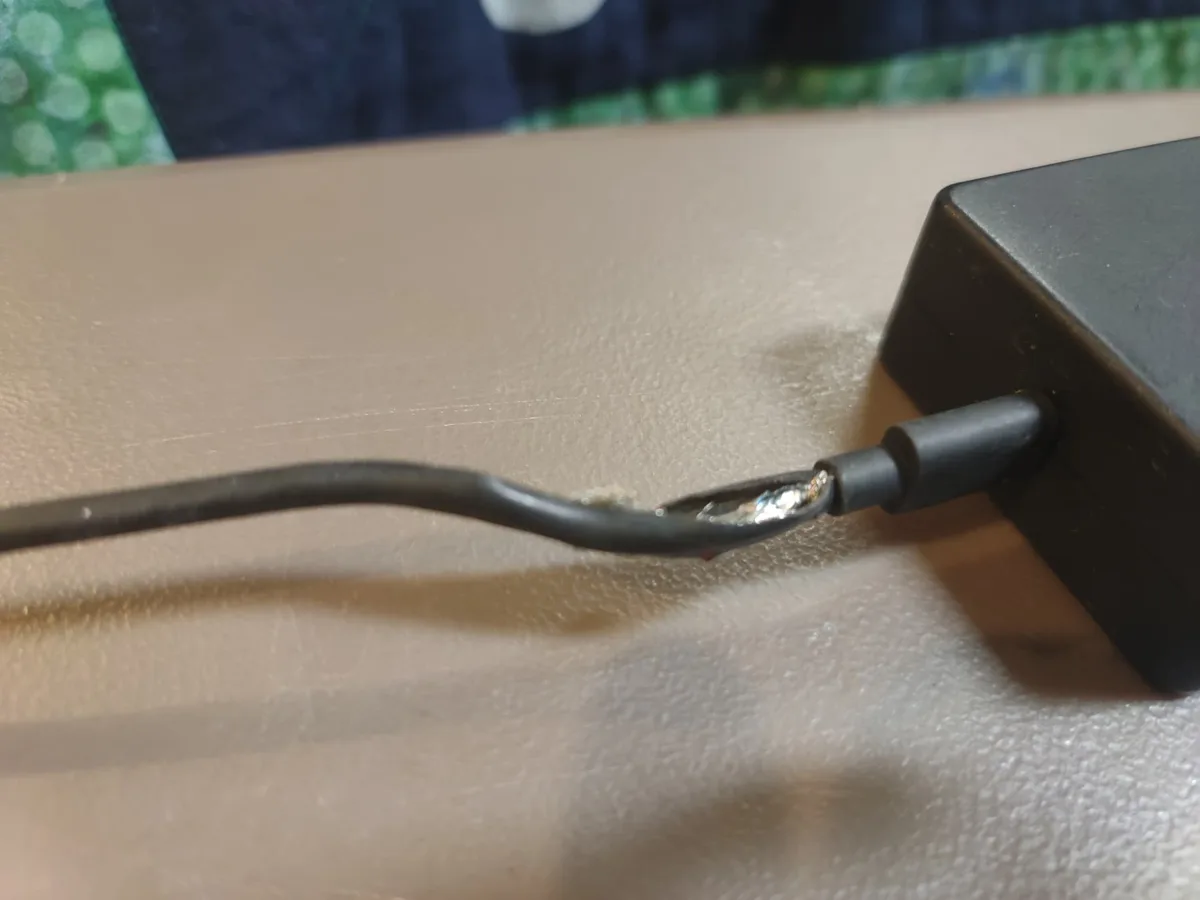
If you find a section that feels "crunchy" or thinner than the rest, the internal wires have likely snapped. Look closely at the strain relief areas near the plugs. If the rubber casing is split, cracked, or deformed, the cable has been subjected to excessive bending.
You should retire any cable that shows exposed wiring or internal insulation tearing for fire safety reasons.
Essential Tools for Stress-Free Cable Management
The right accessories make consistent cable care easier to maintain during your daily routine. You don't need expensive gadgets, but using the correct materials prevents the accumulation of sticky residue and prevents mechanical damage.
- Hook-and-loop straps: These are superior to adhesive ties or plastic clips because they are adjustable and reusable.
- Silicone cable wraps: These provide a gentle, non-slip grip that keeps coils from expanding inside your bag.
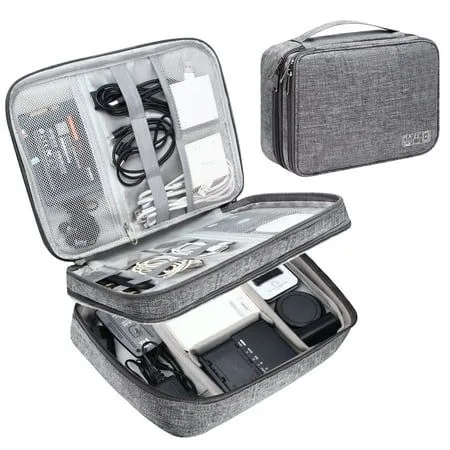
- Electronics pouches: Look for soft-lined, semi-rigid cases that protect the power brick from impact while providing enough space to store the cable without compression.
Avoid using twist ties or heavy-duty zip ties. Metal twist ties can pierce the cable jacket, creating a hazard where copper strands can become exposed or short out. Zip ties are often tightened too aggressively, which creates permanent localized pressure points that damage internal shielding.
Comparing Storage Methods: Bags, Pouchs, and Desk Clutter
Where you put your charger matters as much as how you coil it. If you throw a loose cable into a backpack with sharp-edged laptops or metal water bottles, you are asking for punctures and crushing damage.
| Method | Protection Level | Best For |
|---|---|---|
| Loose in Bag | Very Low | Short commutes, low-traffic days |
| Rubber Band Bound | Low | Temporary storage, quick setups |
| Dedicated Pouch | High | Travel, daily office commuting |
| Hard-shell Case | Maximum | Long-distance travel, heavy gear bags |
Dedicated electronics pouches allow you to isolate the power brick from the cable. This prevents the brick's weight from pressing sharp edges into the cable sheath. If you choose a soft case, ensure it has enough internal room so you aren't fighting to close the zipper.
A compressed bag puts hidden strain on the cable's strain relief points, even when you aren't moving.
Common Wrapping Mistakes You Should Stop Making Today
The most frequent error is the "elbow wrap." This involves holding the cable at one end and wrapping it repeatedly around your elbow and hand. This creates uneven loops that are prone to knotting and tangling.
Another major mistake is wrapping the cable tightly around the power brick. The brick has hard, 90-degree corners that create significant stress points. Over time, the cable jacket will thin out at these corners, eventually exposing the internal wiring.
Avoid "pulling through" the connector. Many people reach for the plug and yank it out of the wall by the cord. This forces the internal solder joints to take the entire weight of the plug and the friction of the socket.
Always grasp the plastic housing of the connector head itself when unplugging your device.
Managing Strain Relief and Connection Points
The strain relief is the molded rubber section where the wire meets the plug. It is designed to allow a gradual bend rather than a sharp one. Even with this protection, constant bending at a 90-degree angle will eventually lead to material fatigue.
- Avoid sharp angles: If your setup forces the cable to bend sharply against a wall or desk, try to reposition the brick.
- Keep it straight: When the cable is plugged in, ensure there is enough slack so the wire hangs naturally.
- Inspect for gaps: If you see the rubber strain relief pulling away from the connector head, the internal wires are likely already compromised.
Real-World Tips for Protecting Cables in Your Backpack
Backpacks are high-pressure environments for tech accessories. Heavy items like laptops and textbooks can easily crush a charger if it is tucked into the wrong corner.
Always designate a specific, accessible pocket for your power supply. Placing the charger near the top of the bag prevents it from being crushed by the weight of your other equipment. If you travel frequently, consider a small, hard-shell container to keep the charger separate from your other gear.
This prevents your keys, pens, or laptop edge from pinching the cord during transit.
Safety Warnings: When to Retire a Frayed Charger
You should stop using a charger immediately if the internal shielding or metallic strands become visible. A compromised cable jacket poses a genuine electrical safety risk. Damaged wires can lead to short circuits, sparking, or even localized overheating that might damage your laptop's charging port.
- Look for burn marks: Discoloration on the plug or the cord indicates heat buildup.
- Check for exposed metal: Even a tiny tear that reveals the inner foil or copper strands is dangerous.
- Assess the heat: If the power brick or the cable feels unusually hot to the touch during normal operation, the internal resistance is too high.
Never attempt to "repair" a cut or frayed cable with electrical tape or duct tape. These are temporary solutions at best and often create a false sense of security. The internal connection is likely already unstable, and makeshift repairs won't fix the underlying fatigue of the copper conductors.
Troubleshooting Intermittent Power and Connection Issues
If your laptop only charges when you hold the cable at a specific angle, you are experiencing the final stages of wire fatigue. This behavior occurs because only a few of the internal copper strands remain connected. When you twist the cable, you force those remaining strands to make contact with each other.
This is a clear indicator that the structural integrity of the cable is gone. You cannot fix this with software updates or battery recalibration. Continued use in this state risks damaging the charging port on your laptop, which is significantly more expensive to repair than replacing a charger.
If you aren't sure if the cable is the issue, try a known-working charger of the same voltage and amperage. If your laptop charges perfectly with the replacement, you have confirmed your original cable is the failure point. Discard the damaged charger responsibly, following local e-waste recycling guidelines.
Quick Reference: Maintaining Your Charger for the Long Haul
Consistency is your best defense against cable failure. Small, daily habits prevent the kind of cumulative wear that ruins equipment over the long term. Treat your charger as a precision electrical tool rather than a generic household string.
- Avoid tight bends: Keep your coil diameter at least four inches wide.
- Unplug by the head: Always pull from the hard plastic housing, never the cord.
- Store loosely: Ensure your cable isn't crimped by other gear in your bag.
- Check monthly: Run your fingers along the length of the cable to feel for irregularities.
Following these steps keeps the internal geometry of the wires undisturbed. By keeping the copper strands parallel and free of kinks, you maximize the number of charge cycles the cable can provide.
Frequently Asked Questions
Can I use electrical tape to fix a frayed cable?
No, electrical tape does not provide structural support or fix the broken copper wires inside. It only masks the damage and often leaves a sticky, degrading residue on the cable. For your safety and your laptop's protection, replace the charger if the insulation is compromised.
Why does my charger only work at a specific angle?
This symptom indicates that the internal copper strands have snapped due to repeated bending or crimping. Only a few strands remain touching, creating a broken, unstable circuit. You must replace the cable to restore reliable power and prevent damage to your computer's power input.
Is it safe to wrap the cable around the power brick?
No, this is one of the most common causes of premature cable failure. The power brick has sharp, rigid edges that create concentrated pressure points on the cord. This stress causes the outer jacket to tear and the internal wires to snap under the tension of the tight wrap.
What is the ideal diameter for coiling a charger cable?
Aim for a coil diameter of at least 4 to 5 inches. This size provides a wide enough bend radius to keep the copper conductors from experiencing excessive tension or compression. Smaller loops force the internal wires to bend too sharply, which accelerates material fatigue and eventual breakage.
How do I know if my cable jacket is failing?
Watch for signs like thinning plastic, visible creases, or exposed internal shielding. Run your fingers along the cable to detect "crunchy" spots or areas that feel thinner than the rest of the cord. If you see any of these indicators, the cable is nearing the end of its functional life.

Similar Posts