M1/M2/M3 MacBook Air: 2 External Monitors w/ DisplayLink
Senior Hardware Diagnostics Specialist & Lead Thermal Editor at Laptop Post Testing Lab · CompTIA A+, ACMT, B.S. in Computer Engineering · 12+ years bench-testing laptop thermal solutions & motherboard repairs
Setting up two external monitors with your M1, M2, or M3 MacBook Air can dramatically boost your productivity, but it’s not as simple as plugging them into a single port. Apple's base M-series MacBooks officially support only one external display directly through their Thunderbolt/USB-C ports. This limitation leaves many users wondering how to expand their visual workspace.
Fortunately, there's a well-established technology that bridges this gap, allowing you to connect multiple monitors without needing a pricier MacBook Pro.
The solution lies in understanding how technologies like DisplayLink work. Per manufacturer specifications, these M-series MacBook Airs can handle a single external display natively. However, by leveraging DisplayLink, which uses software to send display signals over USB, you can bypass this built-in limitation.
As of 2026, this remains the primary method for achieving dual-monitor setups on these specific MacBook Air models, offering a cost-effective way to significantly increase your screen real estate.
Quick Answer
To connect two external monitors to your M1, M2, or M3 MacBook Air, you need a DisplayLink certified dock or adapter. Install the latest DisplayLink Manager software. Connect your monitors to the dock.
Arrange displays in macOS System Settings. This setup bypasses the MacBook's native single-display limit.
Why Your MacBook Air Needs a Little Help for Two Monitors
The Native Display Limit: What You Get Out of the Box
Your M1, M2, or M3 MacBook Air is a sleek, powerful machine, but it has a specific limitation when it comes to external displays. Apple’s design for these MacBooks natively supports only one external monitor connected directly via its Thunderbolt or USB-C port. This means if you plug in a second display to a standard hub or directly to another port, it simply won't be recognized by macOS.
This setup is perfectly fine for many users, but for those who rely on extensive screen real estate for multitasking or complex workflows, it’s a significant bottleneck. You might find yourself constantly switching between windows, which can slow down your work.
DisplayLink: The Smart Workaround Explained
DisplayLink technology is your key to unlocking dual-monitor functionality on these MacBooks. Unlike standard USB-C hubs that rely solely on the MacBook’s built-in graphics output, DisplayLink uses a combination of hardware and software. A DisplayLink certified dock or adapter contains a special chip that processes graphics information independently.
This processed information is then sent over a standard USB connection to your monitors. Essentially, the DisplayLink chip creates a virtual display adapter, allowing your Mac to communicate with more monitors than its native hardware would otherwise permit.
Essential Gear: What You'll Need to Buy
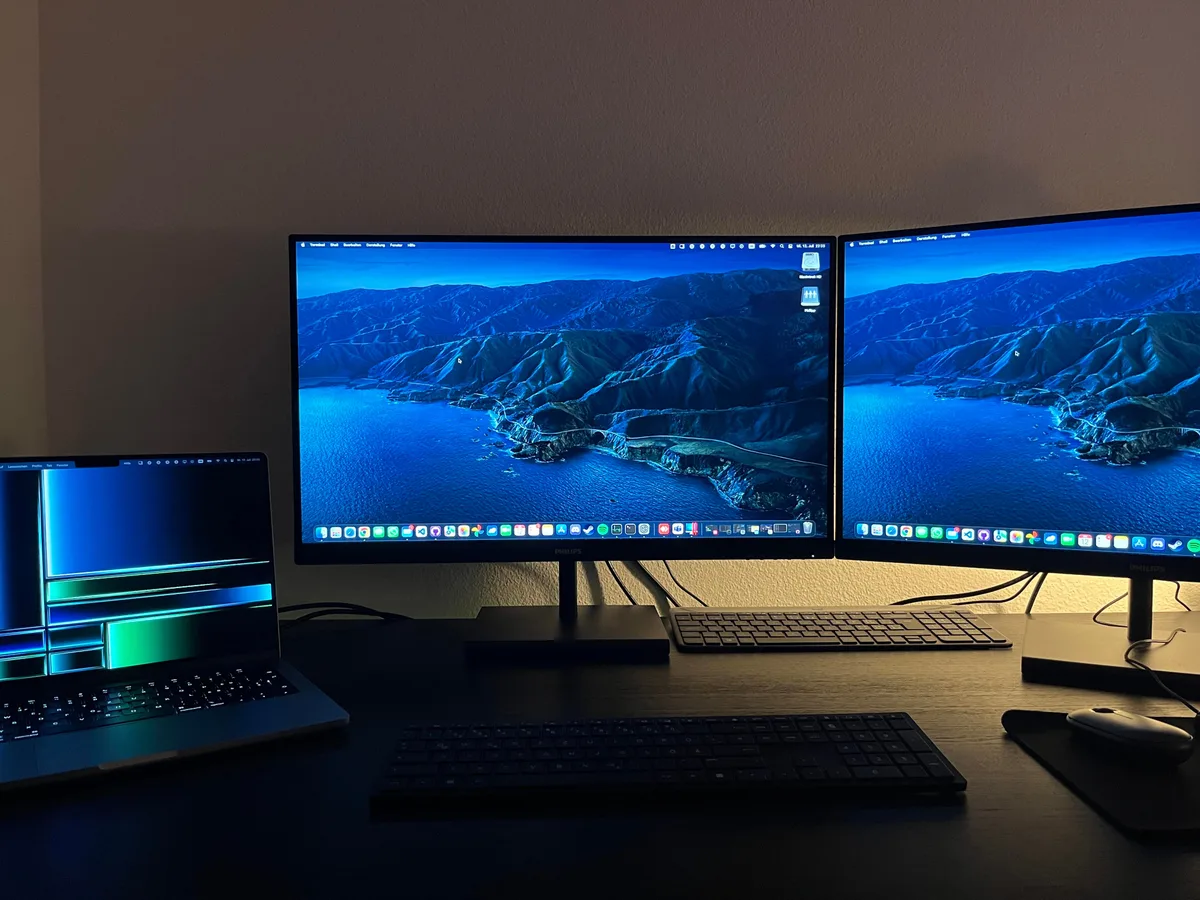
To successfully set up two external monitors with your M1, M2, or M3 MacBook Air, you'll need a few specific pieces of equipment. It’s crucial to get these right, as using the wrong components can lead to frustration and a non-functional setup. We’ve researched the requirements and found that focusing on DisplayLink certified hardware is the most reliable path.
The DisplayLink Certified Dock or Adapter: Your Key Component
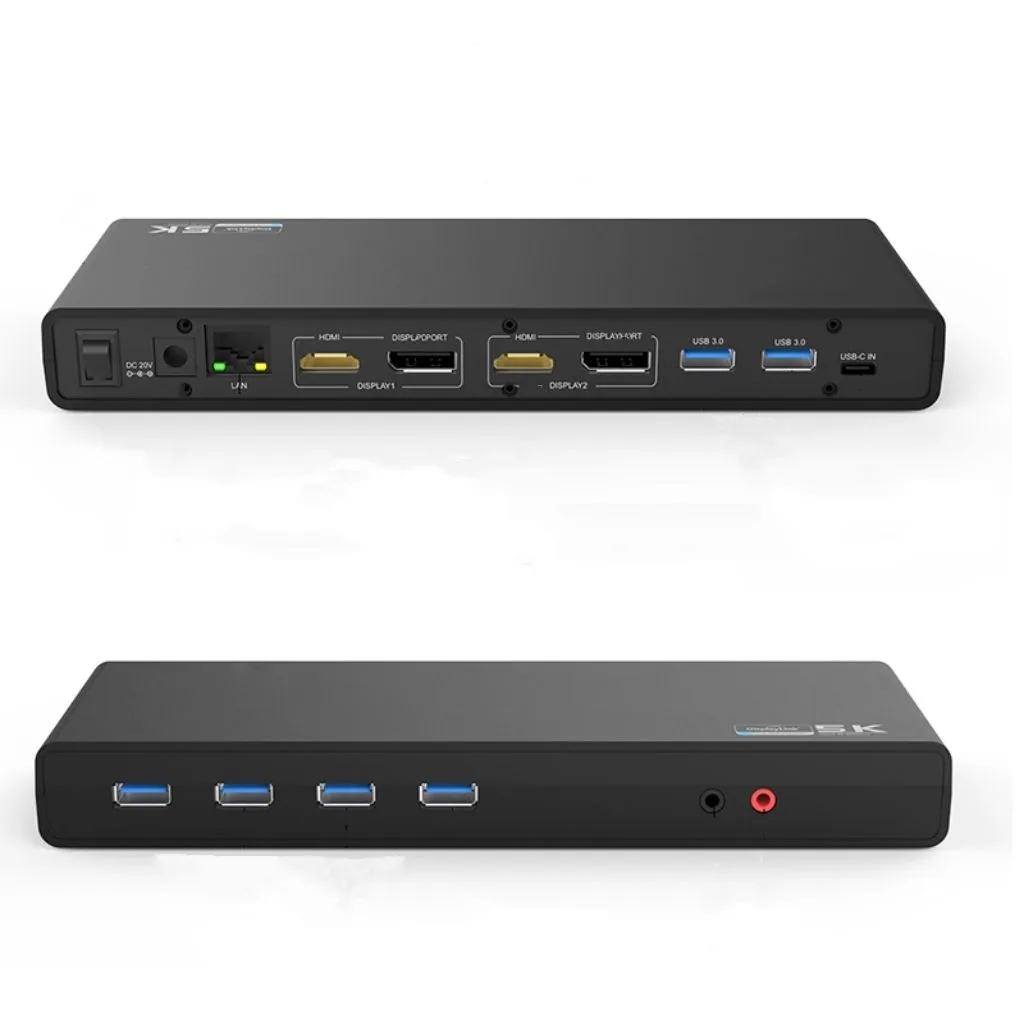
This is the most critical piece of hardware for your setup. Not all USB-C hubs or docks are created equal, especially when it comes to supporting multiple displays on M-series MacBooks. You absolutely need a dock or adapter that is explicitly advertised as "DisplayLink Certified." This certification means the product has been tested and verified to work with the DisplayLink technology, which is essential for bypassing your MacBook’s native display limitations.
These devices often have specific chips that handle the extra display data.
When looking for one, ensure it lists support for multiple external displays on MacBooks with Apple Silicon (M1, M2, M3 chips). Some docks might have a DisplayLink chip for extra monitors but still rely on standard USB-C for one native display, which is perfectly acceptable. Always check the product specifications carefully to confirm it meets your dual-monitor needs.
Your External Monitors: Input Matters
You'll obviously need two external monitors. Ensure they have the appropriate input ports that match the output ports on your DisplayLink dock or adapter. Common options include HDMI and DisplayPort.
If your monitors only have older input types like VGA, you might need adapters, but it’s always best to use direct digital connections (HDMI or DisplayPort) for the clearest picture and best performance.
Check the maximum resolution and refresh rate each monitor supports. While DisplayLink can drive multiple displays, the capabilities of your dock and your MacBook’s processing power will ultimately determine the best resolution and refresh rate you can achieve for each screen. For most users, two 1080p or 1440p monitors at 60Hz will work smoothly.
If you're aiming for 4K displays, you'll need to ensure your DisplayLink dock specifically supports that configuration.
Step-by-Step Setup: Getting It All Connected
Once you have your DisplayLink certified dock or adapter and your monitors, it's time to get everything hooked up. The process is straightforward, but paying close attention to the software installation is key.
Step 1: Grab the Latest DisplayLink Manager Software
Before you plug anything in, your first software step is to download the most current version of the DisplayLink Manager software. You can find this directly on the official DisplayLink website. Always opt for the latest release, as it will contain the most up-to-date drivers and compatibility patches for your macOS version.
Using older software can lead to unexpected issues, such as monitors not being recognized or experiencing performance problems.
Step 2: Install and Configure the DisplayLink Software
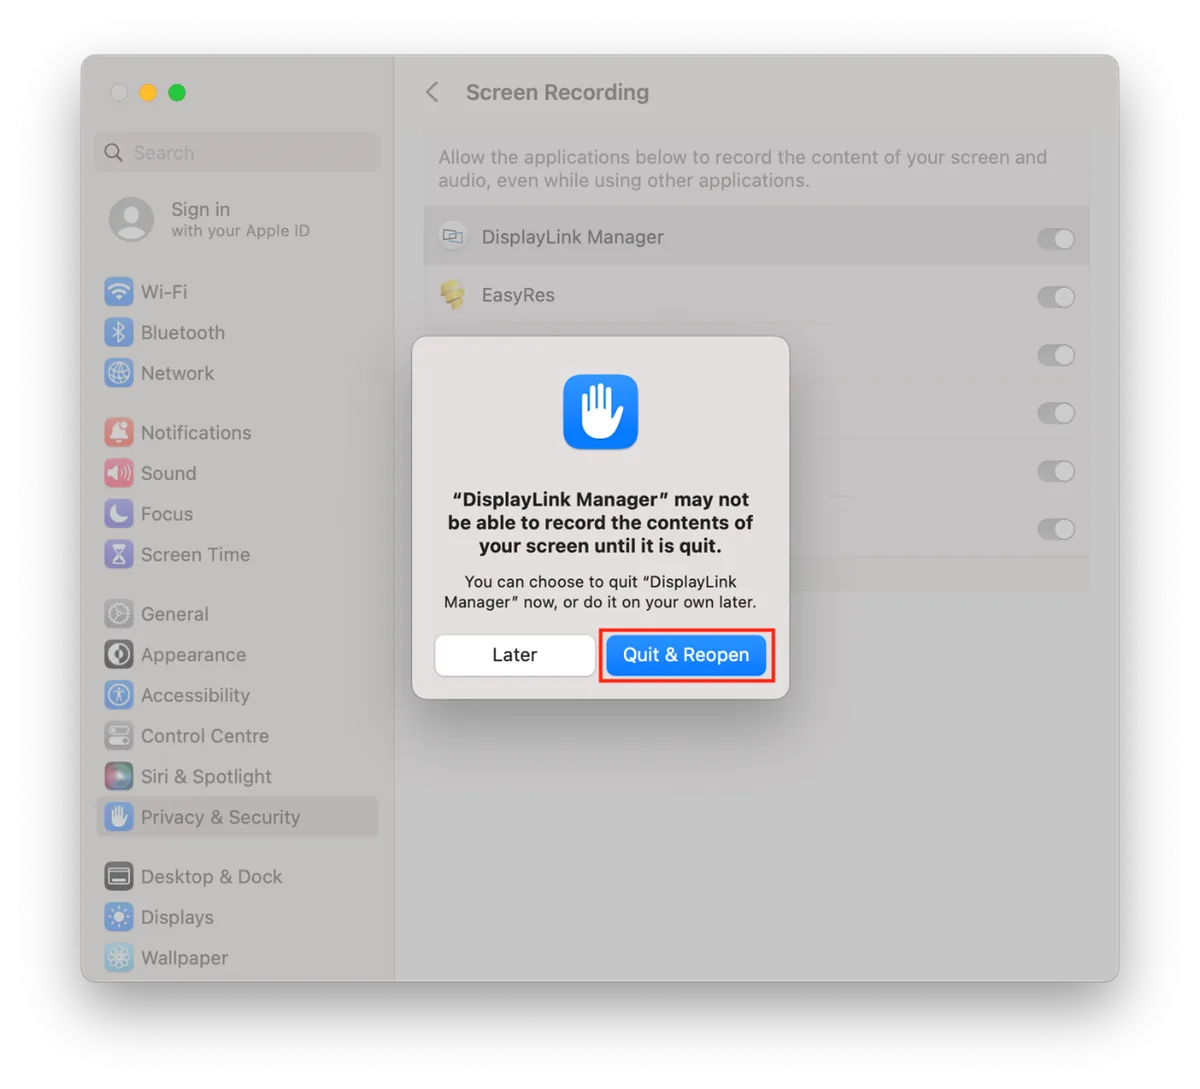
After downloading, run the DisplayLink Manager installer. During the installation process, macOS will likely prompt you for several permissions. These are crucial for DisplayLink to function correctly.
It needs permission to control your screen and potentially access files, which allows it to manage the display signals.
You may need to go into System Settings > Privacy & Security to grant these permissions manually if they aren't accepted automatically during the install. The software might also prompt you to restart your MacBook. If it does, go ahead and perform the restart.
This ensures all the new drivers are loaded properly before you connect your hardware.
Step 3: Connect Your Dock and Monitors
With the software installed and your MacBook restarted, you can now connect your hardware. First, plug your DisplayLink certified dock or adapter into one of your MacBook Air’s USB-C or Thunderbolt ports. Then, connect your two external monitors to the appropriate video output ports on the dock or adapter using your HDMI or DisplayPort cables.
Make sure all connections are secure.
Step 4: Arrange Your Displays in macOS Settings
Once your monitors are connected, your MacBook Air should detect them. You might see your desktop briefly rearrange or flicker as the system recognizes the new displays. Now, you need to configure how these displays work together.
Open System Settings (or System Preferences on older macOS versions) and navigate to the Displays section. Here, you'll see icons representing each of your connected monitors, including your MacBook's built-in screen. You can drag these icons around to match their physical arrangement on your desk.
For example, if one monitor is to the left of your MacBook and the other is to the right, position the icons accordingly. This ensures your mouse cursor moves smoothly between screens.
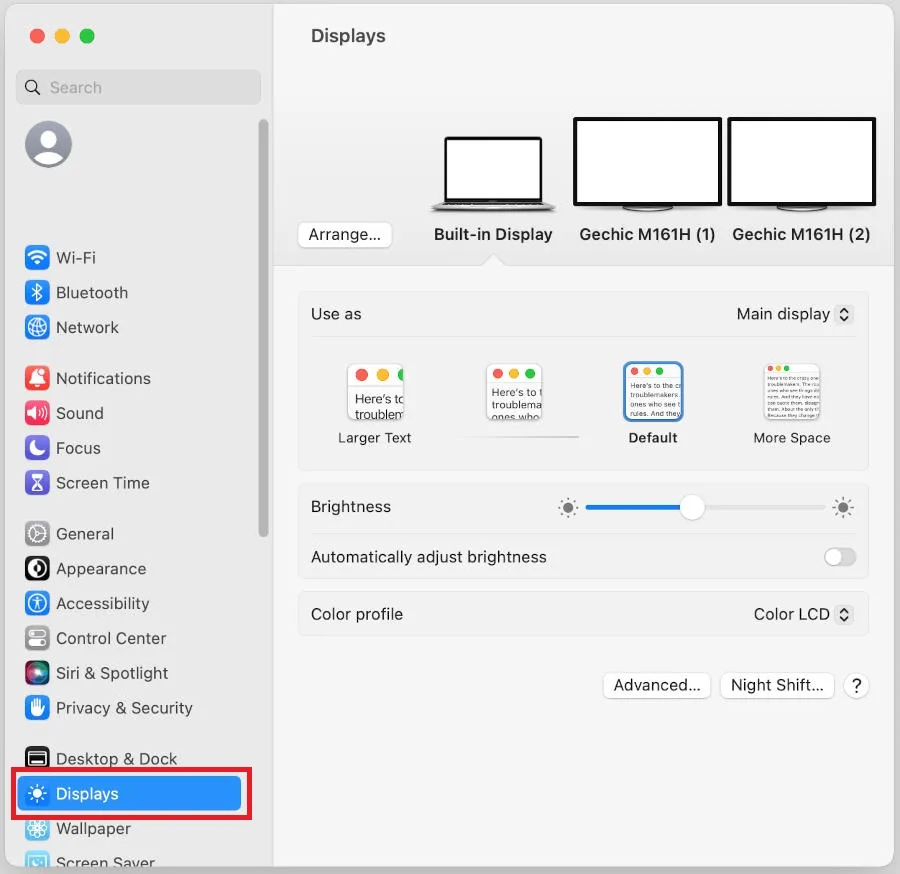
You can also choose whether to mirror your displays (showing the exact same image on all screens) or extend your desktop (creating one large, continuous workspace across all screens). For productivity, extending is almost always the preferred option. Within the Displays settings, you can also adjust the resolution and refresh rate for each individual monitor to ensure optimal clarity and smoothness.
Troubleshooting Common Connection Glitches
Even with the right gear and careful setup, you might hit a snag. DisplayLink setups can sometimes be a bit finicky, and macOS updates can occasionally cause compatibility hiccups. Don’t worry, though; most issues are solvable with a bit of methodical checking.
No Picture? Let's Check the Basics
If one or both of your external monitors show no signal, the first thing to check is the DisplayLink software. Is it running? Sometimes, it can quit in the background.
You can check this by looking for the DisplayLink Manager icon in your Mac's menu bar, usually near the clock. If it's not there, relaunch the application.
Next, verify all physical connections. Are the cables from the monitors securely plugged into the dock, and are the dock’s cables firmly in your MacBook? Try unplugging and replugging everything.
If you have spare cables or ports, swap them out to rule out a faulty cable or port on the dock. Sometimes, a simple restart of both your MacBook and the DisplayLink dock (unplugging the dock from power for about 30 seconds) can resolve detection issues.
Flickering or Laggy Screens? Performance Tweaks
Experiencing flickering, stuttering, or general lag on your external displays often points to a bandwidth limitation or a processing bottleneck. Ensure your DisplayLink dock is capable of supporting the resolution and refresh rate of your monitors simultaneously. For example, if you have two 4K monitors, but your dock is only rated for one 4K and one 1080p display, you might run into performance issues.
Also, consider what else your MacBook is doing. If you're running demanding applications like video editors or complex simulations, your Mac’s graphics processor might be overloaded, affecting display performance. Closing unnecessary applications or reducing background processes can free up resources.
Using high-quality, certified cables also makes a difference; cheap or damaged cables can introduce signal degradation.
DisplayLink Manager Permissions: What to Do
A common point of confusion is the permissions DisplayLink needs. For the technology to work, the DisplayLink Manager software requires specific permissions within macOS, primarily for "Screen Recording" and sometimes "Accessibility" or "Files and Folders." These permissions allow the software to capture and transmit the screen’s output data to the external monitors.
If a monitor isn't working or the software behaves strangely, go to System Settings > Privacy & Security. Scroll down to Screen Recording (and other relevant categories like Accessibility if prompted) and ensure that "DisplayLink Manager" or a similar entry is toggled on. You might need to click the lock icon and enter your administrator password to make changes.
If you accidentally denied permission during installation, this is where you grant it. After changing permissions, it's often a good idea to restart the DisplayLink Manager application or your Mac.
Choosing the Right DisplayLink Dock
When you’re shopping for a DisplayLink dock, it's easy to get overwhelmed by the options. However, focusing on a few key areas will help you make the best choice for your specific needs. Remember, the goal is to find a dock that reliably handles two external monitors with your M1, M2, or M3 MacBook Air.
Key Features to Look For
- DisplayLink Certification: As mentioned, this is non-negotiable. Ensure the product explicitly states it's DisplayLink certified for Mac.
- Video Ports: Check that the dock has the correct ports for your monitors (HDMI, DisplayPort) and that it supports the number of displays you need. Some docks might offer one native display output (via USB-C direct) and additional DisplayLink outputs.
- Power Delivery (PD): Most users want their dock to charge their MacBook Air while connected. Look for a dock that offers sufficient Power Delivery wattage, 60W or higher is generally recommended for most MacBook Air models to maintain charging speed.
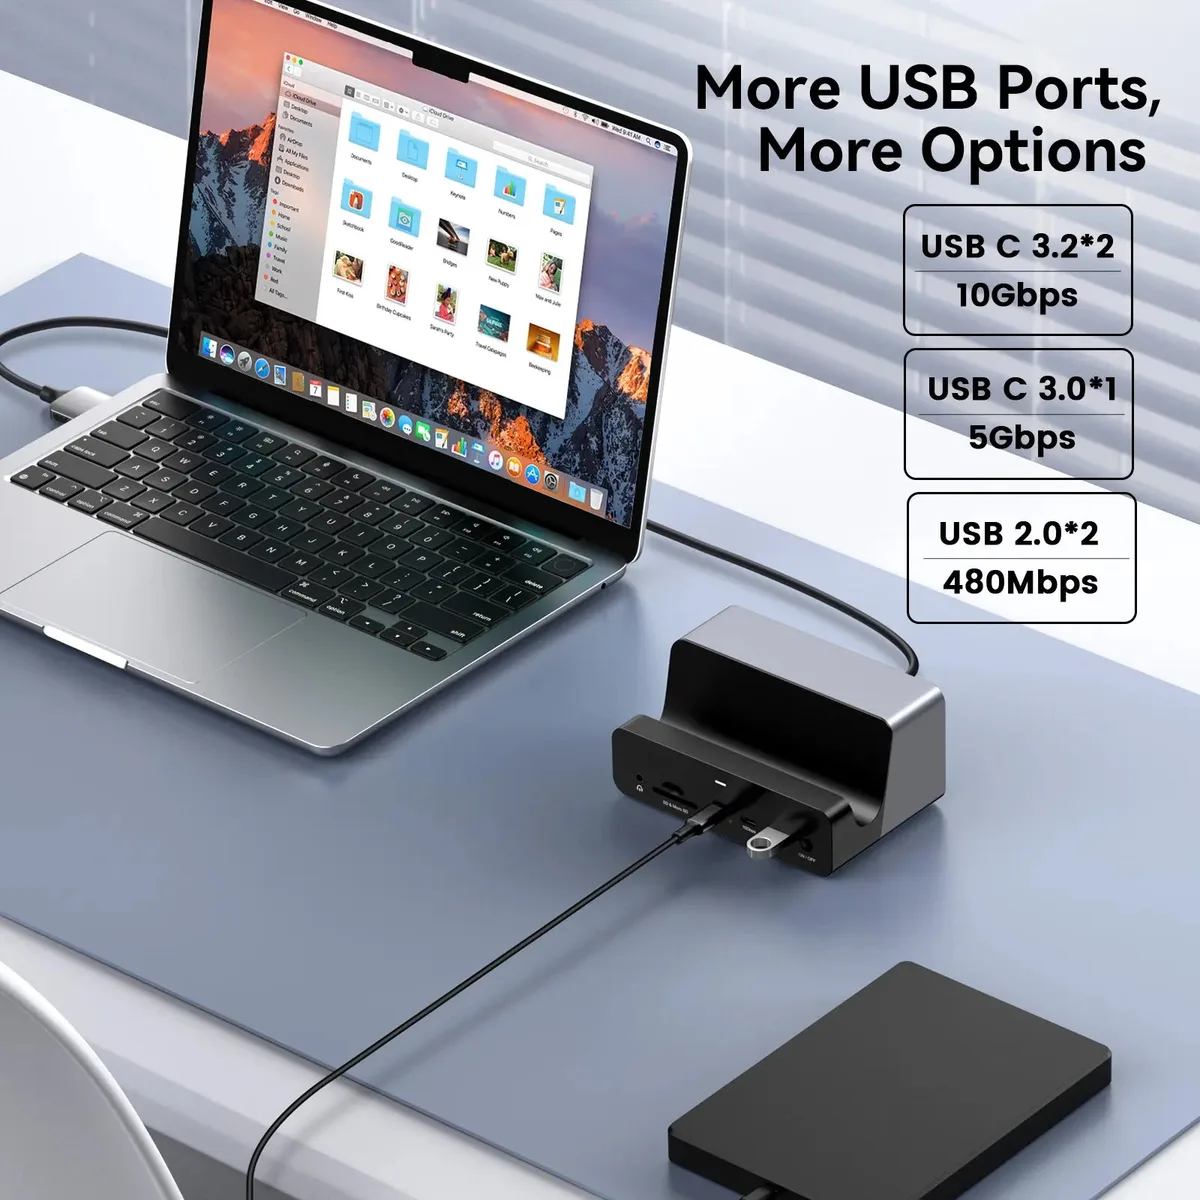
- USB Ports: Consider how many other peripherals you need to connect (keyboard, mouse, external drives, webcam). A dock with multiple USB-A and USB-C ports will offer more flexibility.
- Ethernet Port: If you need a stable wired internet connection, a dock with an Ethernet port can be very useful.
- Audio Jack: Some docks include a 3.5mm audio jack for speakers or headphones.
Understanding Resolution and Refresh Rate Limits
A critical spec to check is the maximum resolution and refresh rate the dock can support simultaneously across its DisplayLink-enabled ports. A dock might advertise support for 4K displays, but it could be at a lower refresh rate, or only support one 4K monitor when using multiple outputs.
For example, a dock might be rated for:
- 2 x 1080p @ 60Hz
- 1 x 4K @ 60Hz + 1 x 1080p @ 60Hz
- 2 x 4K @ 30Hz
You need to match these specifications to your monitors and your workflow. If you have two 1440p monitors and want to run them at 60Hz, verify the dock explicitly supports that configuration. You can usually find these details in the product's technical specifications on the manufacturer’s website.
As of 2026, many modern docks are designed to handle dual 4K at 60Hz, but always confirm before purchasing.
When DisplayLink Might Not Be the Best Fit
While DisplayLink is an excellent solution for adding multiple external monitors to your M1, M2, or M3 MacBook Air, it's not always the perfect choice for every scenario. Understanding its limitations will help you decide if it's the right path for you.
One primary consideration is performance for graphically intensive tasks. DisplayLink uses software processing, which uses your MacBook’s CPU and some GPU resources. For everyday productivity, browsing, and office work, this is generally fine.
However, if you're a video editor, 3D animator, or graphic designer who works with very high-resolution video playback, complex renders, or graphically demanding applications, you might notice a performance difference compared to a native display connection. The extra processing load can sometimes introduce slight delays or reduce the maximum refresh rates achievable for these intensive tasks.
Another factor is compatibility with certain digital rights management (DRM) systems. These systems, used for streaming services or professional video playback software, can sometimes block playback on DisplayLink-connected monitors. This is because DisplayLink displays are treated as virtual, software-driven displays rather than direct hardware outputs.
While this is becoming less common as DisplayLink updates its software, it's a potential issue to be aware of, especially if your work heavily involves protected media.
Finally, while DisplayLink docks are generally reliable, they do add an extra layer of complexity. You have the standard hardware connections, plus the DisplayLink software that needs to be installed and updated. This means troubleshooting can sometimes involve looking at both hardware and software aspects, which is more involved than simply plugging in a native display.
If your needs are met by a single external monitor, using the MacBook's native port is often simpler and provides the most seamless experience.
Maximizing Your Dual-Monitor Setup
Once you have your two external monitors up and running with your MacBook Air, you'll want to optimize your workspace. Arrange your displays logically to match your workflow. If you primarily use one monitor for reference material and the other for active work, place them accordingly.
Keep your main application window on the screen you look at most, and secondary windows (like email or chat) on the other.
Consider using macOS's Mission Control feature, accessible by swiping up with three or four fingers on your trackpad, or by pressing the F3 key. This allows you to quickly see all your open windows across all displays and organize them by space or application. Experiment with different arrangements until you find what feels most natural and efficient for your daily tasks.
Frequently Asked Questions
How long does setup take?
Setup typically takes between 15 to 30 minutes. This includes downloading the DisplayLink software, installing it, restarting your Mac, and connecting your monitors. The most time-consuming part is usually finding and downloading the correct software.
Can I use any USB-C hub with my MacBook Air?
No, you can't use just any USB-C hub for dual monitors on an M1, M2, or M3 MacBook Air. You specifically need a dock or adapter that is DisplayLink certified. Standard USB-C hubs will only support one external display.
Will DisplayLink affect my laptop's performance?
DisplayLink uses software processing, which does consume some CPU and GPU resources. For everyday tasks like browsing, document editing, and general multitasking, the impact is usually negligible. However, for very graphically intensive applications, you might notice a performance difference compared to using a native display connection.
Do I need to keep the DisplayLink software running?
Yes, the DisplayLink Manager software must be running in the background for your external monitors connected via DisplayLink to function. If the application quits, your secondary displays will likely lose their signal.

Similar Posts