How to Test Laptop Battery Voltage with a Digital Multimeter
Senior Hardware Diagnostics Specialist & Lead Thermal Editor at Laptop Post Testing Lab · CompTIA A+, ACMT, B.S. in Computer Engineering · 12+ years bench-testing laptop thermal solutions & motherboard repairs
If your laptop dies mid-task or won’t hold a charge past an hour, learning how to test laptop battery voltage with a digital multimeter rules out faulty hardware fast. Most users assume their battery is dead when the OS reports poor health, but that reading is often skewed by bad calibration. A quick voltage check gives you a hardware-level answer in under 2 minutes.
Per IEC 62133 lithium battery safety standards as of 2026, standard 3.7V lithium-ion cells read 4.2V at full charge and 3.0V at minimum safe discharge. This baseline lets you cross-check your multimeter reading against your battery’s actual health, no guesswork required. Let’s start with the quick answer, then walk through the full testing process.
Quick Answer
Set your digital multimeter to DC voltage mode. Touch the red probe to the battery’s positive terminal. Touch the black probe to the negative terminal.
Compare the reading to your battery’s cell count baseline. A reading within 0.2V of the expected full charge value means healthy.
The Laptop Battery Issues a Voltage Test Actually Solves
A voltage test with a digital multimeter fixes three common laptop power headaches. If your laptop shuts down randomly even at 30% reported charge, low cell voltage is almost always the root cause. If your OS says your battery is at 10% health but the laptop still runs for 3 hours, the reading is likely miscalibrated.
If you bought a used or aftermarket battery, a voltage check confirms it’s not mislabeled as a higher cell count. This test also catches early cell degradation before a full failure leaves you stranded.
Key Variables That Change Your Testing Workflow
Your testing workflow shifts based on two key variables: battery type and cell count. First, removable batteries have exposed terminals you can test without disassembly, while internal batteries require accessing the connector inside the laptop chassis. Second, laptop batteries come in 3-cell, 4-cell, 6-cell, and 9-cell configurations, each with a different expected voltage range.
Manufacturer specifications indicate the following baseline voltage ranges for common laptop batteries as of 2026:
| Cell Count | Nominal Voltage | Full Charge Voltage |
|---|---|---|
| 3-cell | 11.1V | 12.6V |
| 4-cell | 14.8V | 16.8V |
| 6-cell | 22.2V | 25.2V |
| 9-cell | 33.3V | 37.8V |
If your multimeter can’t measure above 20V DC, you won’t get an accurate reading for 6-cell or 9-cell batteries. Auto-ranging multimeters adjust automatically, so you don’t need to select a range manually for these models.
Pre-Test Safety & Prep for Lithium-Ion Batteries
Lithium-ion laptop batteries carry fire and explosion risk if mishandled, so prep is non-negotiable. Start by powering off your laptop fully and unplugging the charging cable. If you’re testing a removable battery, take it out of the laptop chassis before touching any terminals.
Skip testing entirely if your battery is swollen, cracked, or leaking, as these are active failure states.
Use probes with intact insulation to avoid accidental short circuits. Work in a well-ventilated area away from flammable materials like paper or curtains. Per CPSC lithium battery handling guidelines, even a minor short can trigger thermal runaway in damaged cells.
Verify your laptop is fully powered off, not just in sleep mode, to avoid stray current during testing. Keep the battery away from conductive metal objects like keys or jewelry while handling terminals. If you’re accessing an internal battery, follow your laptop manufacturer’s official service manual disassembly steps to avoid damaging internal components.
Never puncture, bend, or put pressure on the battery casing during handling.
Step 1: Choose Your Testing Path (Removable vs Internal Battery)
Your testing workflow splits into two clear paths based on your battery’s physical design. First, identify if your battery is removable: these are the plastic brick-style packs that slide out of a dedicated bay on the laptop’s bottom edge, with exposed positive and negative terminals clearly marked on the label.
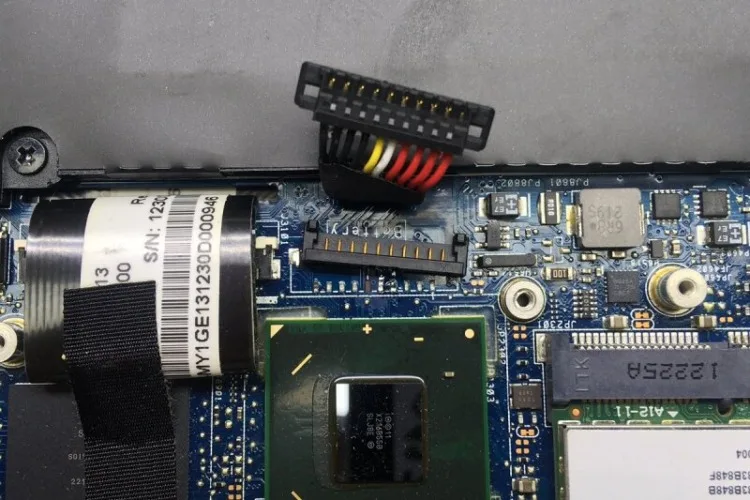
If you have a removable battery, you’ll test the exposed terminals directly, no disassembly required. If your battery is internal, it’s a flat, rectangular pack screwed or glued into the laptop’s chassis, with no exposed terminals. For internal batteries, you’ll need to remove the laptop’s bottom case to locate the small white JST PH 2.0mm connector plugged into the motherboard.
For Apple MacBooks with T2 security chips, you’ll also need to disconnect the battery connector from the logic board before testing, per Apple’s official service documentation. This prevents stray power from the laptop’s internal circuits skewing your reading.
Step 2: Configure Your Digital Multimeter for DC Voltage
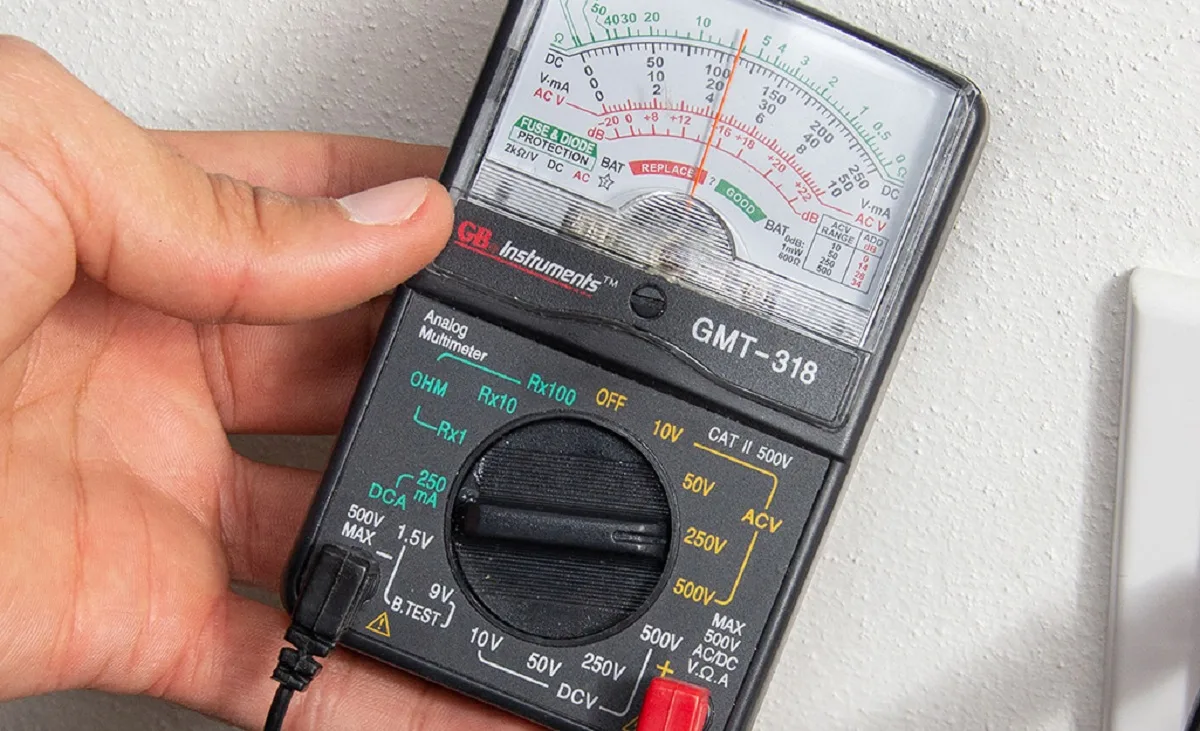
Start by plugging your multimeter probes into the correct ports on the multimeter body. Insert the red probe into the port labeled VΩmA, and the black probe into the port marked COM. Turn the multimeter dial to the DC voltage setting, marked with a solid line and dashed line above a V, or labeled DCV.
If you have a manual-ranging multimeter, set the range to 20V DC, which covers all standard laptop battery configurations up to 9-cell packs as of 2026. Auto-ranging multimeters will adjust their range automatically when you touch the probes to the battery terminals, so you don’t need to select a range manually for these models.
Double-check that you’re not on the AC voltage setting, marked with a wavy line above a V. AC mode is for testing wall outlets, and it will return a meaningless reading or no reading at all when connected to a battery. If your multimeter has a continuity beep function, make sure it’s turned off, as this can interfere with voltage readings.
Step 3: Connect Probes to the Correct Battery Terminals
Match probe polarity to the battery terminals to avoid damaging the multimeter or the battery’s BMS. The positive terminal is marked with a plus sign, a red terminal cap, or the word "POS" on removable batteries. The negative terminal is marked with a minus sign, a black terminal cap, or the word "NEG".
Touch the red probe firmly to the positive terminal. Touch the black probe firmly to the negative terminal. Hold the probes steady for 2 to 3 seconds to let the multimeter stabilize to an accurate reading.
If the reading jumps wildly or shows negative values, you’ve swapped the probes, or the terminal contact is corroded.
For internal batteries with JST PH 2.0mm connectors, use the probe tips to touch the small metal tabs inside the connector housing. The tab closest to the battery label is positive, and the tab farthest from the label is negative. Avoid touching the small middle thermistor pin, as this can damage the battery’s protection circuit.
Interpret Your Reading: The Battery Health Decision Guide
Use the cell count voltage baselines from the Key Variables section to interpret your reading. A reading within 0.2V of the full charge voltage for your battery’s cell count means the battery is healthy. A reading 0.3V to 1V below the full charge value indicates moderate cell degradation, and the battery will hold less charge than it did when new.
If your reading is more than 1V below the full charge value, your battery has significant degradation and will likely fail soon. A reading of 0V or a negative value means you’ve swapped probes, the battery is completely dead, or the BMS has shut the battery down due to a fault. A reading higher than the full charge value for your cell count is rare, and usually indicates a faulty BMS or a mislabeled aftermarket battery.
| Reading vs Full Charge Baseline | Battery Health Status | Recommended Action |
|---|---|---|
| Within 0.2V | Healthy | No action needed, calibrate the battery in your OS if drain feels off |
| 0.3V to 1V below baseline | Moderate degradation | Plan for a replacement within 3 to 6 months, avoid heavy unplugged use |
| More than 1V below baseline | Severe degradation | Replace the battery immediately to avoid unexpected shutdowns |
| 0V or negative | Dead / BMS fault | Do not attempt to charge, dispose of the battery per local e-waste rules |
| Above full charge baseline | Faulty BMS / mislabeled | Do not use the battery, replace it immediately to avoid safety risks |
Recommended Actions for Each Test Outcome
This section uses a clear if/then decision tree to match your voltage reading to the right next step. If your reading falls within 0.2V of the full charge baseline for your cell count, your battery is healthy. Calibrate the battery in your OS to fix any skewed percentage readings.
If you still experience random shutdowns, the issue is likely the laptop’s charging circuit or a loose battery connector, not the cells themselves.
If your reading is 0.3V to 1V below the full charge baseline, your battery has moderate degradation. Avoid heavy unplugged use for the next 3 to 6 months. Schedule a replacement before the battery fails completely.
Test the voltage again in 2 weeks to confirm the drop isn’t a temporary calibration error.
If your reading is more than 1V below the full charge baseline, your battery has severe degradation. Stop using it for unplugged work immediately. Replace the battery as soon as possible to avoid unexpected shutdowns that can corrupt files or damage the laptop’s power delivery system.
If your reading is 0V or negative, first double-check that your probes are not swapped. If they are correctly placed, the battery is either completely dead or the BMS has tripped to a protected state. Do not attempt to charge it.
Dispose of the battery per local e-waste regulations, as outlined by the US CPSC lithium battery safety guidelines.
If your reading is higher than the full charge baseline for your cell count, the battery’s BMS is faulty or the battery is mislabeled as a higher cell count. Stop using it immediately, as this poses a fire and explosion risk. Replace it with a verified OEM or certified aftermarket unit.
Mistakes That Invalidate Your Test or Create Safety Risks
The most common testing mistake is setting the multimeter to AC voltage instead of DC. This returns a meaningless or zero reading, leading you to think the battery is dead when it’s not. Always confirm the dial is set to the DCV setting, marked with a solid line and dashed line above the V, before touching the probes to the battery.
Swapping the positive and negative probes gives a negative reading, which can damage low-quality multimeters. It won’t harm the battery, but it makes your data useless. Double-check probe placement against the terminal markings before making contact.
Touching the small middle thermistor pin on a JST PH 2.0mm laptop battery connector damages the battery’s protection circuit. This can brick the battery, prevent it from charging, or cause it to report incorrect capacity. Keep probe tips only on the two outer power terminals when testing internal batteries.
Testing a swollen, cracked, or leaking battery poses an immediate fire and explosion risk. Per IEC 62133 lithium battery safety standards, these are active failure states that require immediate disposal, not testing. Move the battery to a non-flammable surface away from any heat sources if you need to transport it for disposal.
Using a multimeter with a maximum DC range below 20V will show an "OL" (over limit) reading for 6-cell or 9-cell batteries. You’ll incorrectly assume the battery is dead. Use a 20V or higher DC range, or an auto-ranging multimeter, to test higher-cell-count packs.
Multimeter Testing vs Other Laptop Battery Diagnostic Methods
Static multimeter voltage testing is the fastest way to get a hardware-level baseline for your battery’s health. It requires no bootable OS, works on dead laptops, and gives you an immediate pass/fail reading. The downside is it only measures open-circuit voltage, not actual capacity under load.
A battery can show a healthy resting voltage but still fail mid-use due to high internal resistance.
OS-level battery reports, like Windows Battery Report or macOS System Information, give detailed metrics including cycle count, full charge capacity, and design capacity. These are great for tracking long-term degradation over time. They require the laptop to boot fully, though, and readings can be skewed by poor calibration.
Use these to track trends, not for immediate dead-battery diagnosis.
Dedicated battery load testers apply a controlled electrical load to the battery to measure its actual capacity in milliampere-hours (mAh). This is the most accurate method for verifying real-world performance, and it’s standard practice for laptop refurbishers and resellers. Load testers cost $20 to $50, though, and take 10 to 15 minutes per test, so they’re overkill for casual users.
Built-in BIOS battery diagnostics give a quick pass/fail result for many laptop models. These are useful if you can’t boot into the OS, but they vary widely by manufacturer and don’t give specific voltage or capacity data. Use them as a quick first check, not a definitive diagnosis.
| Diagnostic Method | Best Use Case | Accuracy for Health Check | Time Required | Cost |
|---|---|---|---|---|
| Multimeter static voltage test | Quick dead battery check, aftermarket battery verification | Good for resting voltage, poor for load performance | 2 minutes | $0 (if you own a multimeter) |
| OS battery report | Tracking long-term degradation | Good for capacity trends, skewed by calibration | 5 minutes | Free |
| Dedicated load tester | Refurbishing, resale verification, capacity confirmation | Excellent for real-world performance | 10-15 minutes | $20-$50 |
| BIOS battery diagnostic | Quick check if laptop won’t boot | Variable, pass/fail only | 1 minute | Free |
Expert Tips for Accurate, Reliable Readings
Wait at least 30 minutes after unplugging the laptop before testing the battery. A battery that’s actively charging or discharging will show a higher or lower resting voltage than its true baseline. This 30-minute cooldown period lets the battery’s open-circuit voltage stabilize for an accurate reading.
Clean the battery terminals with a dry, lint-free cloth before testing. Corrosion, dust, or residue adds electrical resistance, leading to falsely low voltage readings. For internal batteries, make sure the JST connector pins are free of debris before inserting your multimeter probes.
For internal batteries, disconnect the main battery connector from the motherboard before testing. Stray current from the laptop’s circuitry can skew the reading by 0.1V to 0.3V, making a degraded battery seem healthy. This step is required for accurate results on most modern laptops with always-on power rails.
If you get a healthy resting voltage but still experience random shutdowns, test the battery under load. Run the laptop on battery only with a moderate workload (like streaming video or browsing) and monitor the voltage drop. A drop of more than 0.5V under load indicates high internal resistance, which means the battery will fail soon even if the resting voltage looks good.
Log your voltage readings every 3 to 6 months in a simple note or spreadsheet. A steady drop of 0.1V per 6 months is normal cell aging. A sudden drop of 0.3V or more in a month indicates a failing cell that needs replacement.
Aggregate user reviews show that most laptop batteries show significant degradation after 300 to 500 full charge cycles as of 2026.
Frequently Asked Questions
Do I need to remove the battery to test voltage?
For removable batteries, take it out of the laptop to test exposed terminals directly. For internal batteries, you only need to access the internal JST connector, no full removal required unless your manufacturer’s service manual specifies it. Always power off the laptop and unplug the charger first.
What voltage is too low for a laptop battery?
A reading more than 1V below the full charge baseline for your cell count indicates severe degradation. For a standard 4-cell battery, that’s below 15.8V (16.8V full charge minus 1V). A reading below 3.0V per cell risks permanent cell damage and should not be charged.
Can a bad battery still show good voltage?
Yes, a battery with high internal resistance can show a healthy resting voltage but fail under load. If your laptop shuts down randomly even with a good voltage reading, check the OS battery report for cycle count or run a load test to confirm actual capacity.
Will testing laptop battery voltage damage the battery?
No, if you follow proper safety steps. The only risks are accidental terminal short circuits or touching the thermistor pin on internal battery connectors, which can damage the BMS. Use insulated probes, avoid contact with the middle pin on JST connectors, and never test swollen or damaged batteries.
How often should I test my laptop battery voltage?
Test it every 6 months if you use your laptop daily, or immediately if you notice random shutdowns, rapid drain, or a sudden drop in OS-reported battery health. Logging readings over time helps you spot degradation early before unexpected failure.
Recommended Actions for Each Test Outcome
Match your voltage to the decision table. Within 0.2V of baseline means healthy. Calibrate the OS if the percentage is off.
0.3V to 1V below baseline means moderate degradation. Plan replacement in 3 to 6 months. Avoid heavy unplugged use.
More than 1V below baseline means severe degradation. Replace immediately. Stop unplugged use to prevent data loss.
0V or negative means dead or BMS-tripped. Don't charge. Dispose per e-waste rules.
Above baseline means faulty BMS or mislabeled battery. Stop using it and replace immediately.
Mistakes That Invalidate Your Test or Create Safety Risks
Using AC voltage mode instead of DC gives a meaningless reading. Always confirm the DCV setting.
Swapping probes causes negative readings. Double-check polarity before contact.
Touching the thermistor pin on a JST connector damages the BMS. Only touch the outer power terminals.
Testing a swollen battery risks fire. Per IEC 62133, dispose of damaged batteries without testing.
A multimeter range below 20V shows "OL" for 6-cell or 9-cell packs. Use 20V range or auto-ranging.
Multimeter Testing vs Other Laptop Battery Diagnostic Methods
Multimeter tests are fast but only measure resting voltage. OS reports track trends but need a bootable system.
Load testers measure actual mAh capacity. They cost $20 to $50 and take 10 to 15 minutes, ideal for refurbishers.
BIOS diagnostics are quick but limited to pass/fail. Use them only if you can't boot the OS.
| Method | Best For | Accuracy | Time | Cost |
|---|---|---|---|---|
| Multimeter | Quick voltage check | Good for resting voltage | 2 min | Free if owned |
| OS report | Long-term trends | Good for capacity trends | 5 min | Free |
| Load tester | Refurbishing, resale | Excellent for real capacity | 10-15 min | $20-$50 |
| BIOS diagnostic | Quick check if laptop won't boot | Pass/fail only | 1 min | Free |
Expert Tips for Accurate, Reliable Readings
Wait 30 minutes after unplugging. This stabilizes the open-circuit voltage.
Clean terminals with a dry cloth. Corrosion causes falsely low readings.
For internal batteries, disconnect the main battery connector. Stray current can skew readings by 0.1V to 0.3V.
If resting voltage is healthy but shutdowns occur, test under load. A drop over 0.5V indicates high internal resistance.
Log readings every 3 to 6 months. A 0.1V drop per 6 months is normal. A 0.3V sudden drop means imminent failure.
Frequently Asked Questions
Do I need to remove the battery to test voltage?
Remove removable batteries; for internal batteries, access the JST connector. Always power off and unplug.
What voltage is too low for a laptop battery?
More than 1V below full charge baseline is too low. For 4-cell, below 15.8V. Below 3.0V per cell risks damage.
Can a bad battery still show good voltage?
Yes, high internal resistance causes failure under load despite good resting voltage. Test under load to confirm.
Will testing laptop battery voltage damage the battery?
No, if you follow safety steps. Avoid short circuits and don't touch the thermistor pin. Use insulated probes.
How often should I test my laptop battery voltage?
Test every 6 months with daily use, or immediately if you notice shutdowns or rapid drain. Log readings to track degradation.

Similar Posts